Limen — Manual
High-frequency acceleration limiter for mixing and mastering.
Background
In audio, the challenge of managing high-frequency energy has existed as long as recording itself. But for much of the analog era, the problem was largely self-correcting. Vacuum tubes, output transformers, and magnetic tape all share a common characteristic: they naturally soften high-frequency transients. The inherent saturation of tape, the bandwidth limitations of transformers, and the gentle compression of tube circuits acted as a built-in safety net — taming harsh peaks before they ever became a problem. Engineers rarely needed to think about high-frequency acceleration because their entire signal chain was quietly managing it for them.
The transition to digital recording and in-the-box mixing changed this equation fundamentally. Digital systems reproduce signals with perfect linearity — every transient, every peak, every microsecond of high-frequency energy is preserved exactly as it arrives. While this is a tremendous advantage for fidelity and transparency, it also means that the natural high-frequency management once provided by analog circuits is no longer there. The result is that modern productions can carry significantly more high-frequency acceleration than their analog predecessors — and with it, a new set of challenges.
But what is high-frequency acceleration? In audio, acceleration describes how rapidly a signal changes direction. A smooth sine wave changes direction gradually, producing low acceleration. A sharp transient reverses direction almost instantly, producing extreme acceleration. Because higher frequencies inherently change direction more often, and transient peaks tend to concentrate their energy in the upper spectrum, high-frequency acceleration is where harshness and perceived sharpness typically originate.
The upper midrange and high frequencies are where the ear is most sensitive to these rapid changes. Uncontrolled transients in this region — aggressive cymbal attacks, snare edge, aggressive sibilance — can make a production feel tiring over time. This is often not a matter of overall level, but of uncontrolled acceleration in the upper frequencies.
Excessive high-frequency peaks also affect the perception of detail and spatial depth. When overhead microphones, snare transients, or fast guitar overtones dominate the upper spectrum, they mask the subtle cues that create a sense of space, vocal presence, and mix clarity. Controlling high-frequency acceleration can unmask the midrange and reveal detail that was always present but obscured — without subtractive EQ, which reduces harshness but takes the desired high-frequency detail with it.
On the technical side, high-frequency acceleration has long been a critical factor in vinyl cutting, where the physical properties of the cutting stylus impose strict limits on velocity and acceleration. Excessive high-frequency energy causes distortion and can exceed the physical velocity limits of the cutting stylus — which is why mastering engineers have relied on high-frequency limiting as a standard part of vinyl preparation for decades. Modern streaming codecs similarly benefit from controlled high-frequency transients, as excessive peaks can increase pre-echo artifacts at lower bitrates.
The applications range from drum bus processing — controlling overhead harshness, snare edge, and hi-hat peaks — to vocal de-essing on the stereo bus, taming harsh guitar overtones and pick noise, and full-mix mastering where controlled high-frequency dynamics separate a professional result from a fatiguing one.
The Concept

Limen is a high-frequency acceleration limiter designed for mixing and mastering applications. Rather than limiting the full signal, Limen isolates and processes only the high-frequency content above a user-defined crossover point. The low frequencies pass through untouched and are recombined after processing.
Traditional high-frequency limiters rely on a fixed threshold and require careful calibration to match the input level. Limen instead responds to high-frequency acceleration directly, adapting automatically to any input level. Recover ensures that Limen respects the frequency response you've carefully crafted — limiting the acceleration, not your sound.
Controls

Active
Enables or disables the Limen processor. When disabled, the signal passes through unprocessed, allowing for quick A/B comparisons.
Note: When Focus Listen is active, toggling Active lets you compare the processed output against the unprocessed signal to hear the effect of the limiter in isolation.

Tilt
Shapes the spectral balance of what the limiter sees. Positive values increase limiting on high frequencies, negative values shift the focus toward low frequencies — shaping both the limiter's behavior and the tonal result.
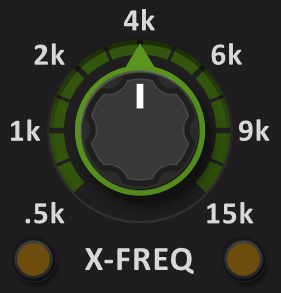
Crossover
Sets the frequency at which the signal is split into low and high bands using a linear-phase crossover filter. Only the high-frequency band above this frequency is processed by the limiter. The low-frequency band passes through unchanged and is recombined after processing.
Lower crossover frequencies include more of the spectrum in the limiting process, while higher values restrict limiting to only the highest frequencies. The linear-phase crossover provides perfect signal reconstruction — with no gain reduction applied, the output is bit-identical to the input.
Note: The crossover slope adapts automatically to the selected frequency. At 4 kHz and above, a steeper slope of 24 dB/oct provides a sharp separation between the bands. As the crossover frequency decreases, the slope is gradually relaxed down to 12 dB/oct at 500 Hz. At lower frequencies, a gentler slope minimizes pre-ringing to the point where it is practically inaudible at moderate settings.

Focus Listen
Two buttons for soloing individual frequency bands:
- LF — Solos the low-frequency band below the crossover, allowing you to hear what is not being processed by the limiter.
- HF — Solos the high-frequency band being processed, allowing you to hear exactly what the limiter is affecting, including all processing stages.
Note: Toggle the Active button to compare processed vs. unprocessed in the focused range.

Depth
Controls the overall strength of the limiting process. At 0, the limiter is completely inactive and no gain reduction occurs. Higher values result in progressively stronger limiting of the high-frequency band.
The control provides a wide range from subtle high-frequency taming to aggressive limiting.
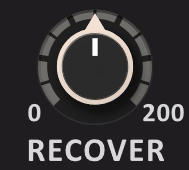
Recover
Ensures that Limen only affects the dynamics of your high frequencies, preserving the tonal balance you've carefully crafted.
At 0%, no correction. At 100%, full spectral balance restoration.
Lower values allow the limiter to naturally soften the high end for a warmer character. Values above 100% push the spectral balance further, adding a silky quality to the high frequencies that conventional EQ cannot achieve.
Tip: Try setting Recover to 150% and slowly increasing the amount of limiting. On material with good transients, this can produce a beautiful high-frequency sheen — often just a few dB of gain reduction is enough.

Output
A simple gain control for compensating any level changes introduced by the processing. Use this to match the processed and bypassed signal levels for accurate comparisons.
Channel Processing

L/R Mode
Processes the left and right channels, optionally linking them. The LINK control (0–100%) determines how much the channels influence each other — at 0%, each channel is limited completely independently, while at 100%, both channels receive identical gain reduction based on whichever channel requires more limiting.

M/S Mode
Processes the mid (center) and side (stereo) components separately. The WEIGHT control (–100% to +100%) adjusts the balance between mid and side limiting. Positive values emphasize mid limiting for controlling centered content, while negative values focus on the side channel for limiting the acceleration.
Reduction Meter

The gain reduction meter shows the current amount of gain reduction being applied by the limiter in real-time, measured in dB. The meter displays per-channel gain reduction, reflecting the actual processing including L/R channel linking and M/S weighting.
Control Behavior

- Reset to default — Double-click directly on the control.
- Edit by text entry — Click the displayed text value, type a new value, then press Enter.
Toolbar


Undo / Redo
Use the undo/redo buttons to recall previous/next parameter changes. The exact event is shown in a tool tip.
Note: certain parameter changes are not tracked by this function (e.g. "Bypass").
Preset Management

The preset drop-down list offers quick access to factory settings and user presets.

The next/previous buttons allow you to cycle through the presets.

Advanced preset management options are available from the context menu (Right-click).
- Reset to Original state — resets the currently active preset to its original state.
- Save As New Global User Preset — opens a dialog to create User Presets. These persist across sessions and DAWs (saved on your machine). Total user presets are limited to 20.
- Overwrite / Rename Selected User-Preset — overwrite or rename presets.
- Delete Selected User Preset — delete the current user preset.
- Save As Default State — replaces the plugin's default preset with the current parameter state.
- Revert Default State To Factory Setting — deletes an overwritten default state.
- Copy State (Ctrl + C) — copies the current control states to the clipboard. Apply across instances and hosts using Paste State.
- Paste State (Ctrl + V) — pastes the control states from the clipboard.
- Share State — opens a dialog with sharing options via e-mail or internet forums.


A/B Control
A/B allows you to compare two alternative parameter states.
A>B and B<A copy one state to the other.

Sidechain
When active, Limen uses the sidechain input signal instead of the main input to drive the limiter's detector. The limiting is still applied to the main input. This allows you to control the high-frequency limiting of one signal based on the dynamics of another signal.

Delta Mode
Toggles Delta Mode on or off. When active, outputs only the difference between the original and processed signals, letting you hear exactly what Limen adds or removes from your audio.
Right-click on the Delta button to access the option Include Recover. When enabled (default), delta shows the difference after Recover has restored the spectral balance — you hear only what the limiter changed dynamically. When disabled, delta also includes the tonal shift that Recover would normally correct.

Oversampling Quality
Controls the internal oversampling factor, which adapts to your session sample rate.
- Off: No oversampling.
- Normal: 2× at 44.1 / 48 kHz, 1× above.
- High: 4× at 44.1 / 48 kHz, 2× at 88.2 / 96 kHz, 1× above.
- Ultra: 8× at 44.1 / 48 kHz, 4× at 88.2 / 96 kHz, 2× above.
Limen's internal signal processing is designed to minimize aliasing by construction. For most use cases, the Off setting provides excellent audio quality. Higher oversampling settings offer a marginal improvement in extreme scenarios but are generally not required.
Use 'Set as Default' to apply your preferred setting to all future instances.

Theme
Opens the color theme selector. Choose from different visual themes to customize the plugin's appearance. Each theme offers a unique color scheme for interface elements.
The selected theme is automatically synchronized across all open instances of the plugin and saved with your preferences.

Help
The dynamic help mode offers detailed information about the various elements of the user interface. Click "?" to activate the online help and move the mouse cursor over the control of interest. A small info bubble will appear displaying the function and details of the item.

Settings
The settings button opens a dialog which gives control over additional plugin options.

- Slider — changes the behaviour of knobs and control points in response to the mouse.
- Continuous Drag — when Velocity is enabled, knob and controller movement relies on mouse speed. When Linear is enabled, knob and controller movement is proportional to mouse movement.
- Drag Sensitivity — sets the linear sensitivity further.
- Mouse Configuration — Left-click & drag (Continuous) and Right-click & drag (Stepped) by default. Selecting Invert Left/Right Buttons swaps the Continuous and Stepped behaviors.
- Interface — three size presets, each configurable between 50% and 200%. Defaults: 100%, 125%, 150%.
- Processing — plug-in latency and sample rate details.
- Highest Quality Rendering — automatically uses Ultra oversampling when your DAW renders offline (bounce / export), regardless of the toolbar setting.
- Registration — offline and online product registration options.
- Local Data — export and import user preferences, presets, and keys. Note that these operations affect all TDR plug-ins.
- Updates — Check for updates and download the latest version. Automatic Lookups can check once per day.
- Help — Documentation and Support links.
- About — version number, build date, format, credits and other information.
Context Menu

Additional options can be accessed using the standard context menu. This is opened by Right-clicking on a blank area anywhere in the UI. A click outside of the menu closes it.
- Shortcuts… — opens the keyboard shortcuts configuration dialog.
- User Interface Scale — selects one of the three size presets defined in the settings dialog.
- Instance — rename the specific plug-in instance.
- Copy State (Ctrl + C) — copies the current control states to the clipboard.
- Paste State (Ctrl + V) — pastes the control states from the clipboard.
- Share State — opens a dialog with sharing options via e-mail or forums.
- Save Screenshots to Desktop — quickly capture the current plugin window and save as a PNG to your desktop.
Shortcuts

Limen supports configurable keyboard shortcuts for quick parameter access. Open the shortcuts dialog via right-click → Shortcuts… anywhere on the plugin interface.
Keyboard shortcuts require the plugin to have keyboard focus. Click anywhere on the plugin interface to grab focus. When "Mouse Focus" is enabled (default), shortcuts are only active while the mouse cursor is over the plugin window — they deactivate automatically when the mouse leaves the UI, preventing accidental triggering from other windows.
- Enable — Enables or disables all keyboard shortcuts globally.
- Show Focus — A coloured border appears around the plugin when shortcuts are active.
- Mouse Focus — Shortcuts are only active while the mouse cursor is over the plugin window.
All shortcuts — including Focus Listen — are fully rebindable. Each shortcut has its own enable checkbox. To reassign, click on the key slot in the dialog and press the desired key. You can also assign Shift or Alt to any slot. Right-click a slot to reset to default or clear. Conflicts are resolved automatically — assigning a key already in use will clear the previous assignment.
Default shortcuts:
- Active (toggle):
E - Delta (toggle):
D - Depth (− / +):
Q/W - Crossover (− / +):
A/S - Tilt (− / +):
Y/X - Recover (− / +):
R/T - Focus Listen LF (hold):
Shift - Focus Listen HF (hold):
Alt(Option on Mac)
Step keys increment or decrement the parameter using snap values for stepped control. Focus Listen shortcuts are hold keys — the effect is active only while the key is held down.
Note: Keyboard shortcut availability depends on the host application. Some DAWs may intercept certain key events before they reach the plugin.
Adaptive Load
Adaptive Load is a mechanism that constantly monitors the audio signal and corresponding states (such as filter memory) and frees up resources whenever possible — without any impact on processing quality. When Limen is inserted on a track where audio only plays during certain parts of the song, the adaptive load mechanism detects silence and bypasses all of Limen's filters and processing, resulting in almost 0% CPU usage. This typically happens within several milliseconds. As soon as audio resumes, Limen re-enables its processing. The entire process is fully transparent without any drawbacks. With Adaptive Load, resources are freed when not needed, which means you can use more plugins in your project and/or you will have lower export rendering times.
Acknowledgements
Limen was conceived and developed by Jan Ohlhorst.
Documentation by Shane Johnson.
Software evaluation by:
Ady Connor, Aleksi Vuolevi, Andrew Boult, Audiobomber | Castlemastering, Bob Olhsson, Cyril Meysson, Dan Suter | echochamber, Dan Worrall, Dax Liniere | Puzzle Factory, Dean, Dennis J Wilkins | Studio 12 Below, Diogo C. Borges, Eden Puder, Eric Recourt, EvilDragon, Greg Reierson, Gregg Janman | Hermetech Mastering, Helmut Erler | mastering.heyrec.org, Ilya Orlov, Janne Hatula, Jean Dante, Jeffrey Rippe, Jerry Anthony Mateo, Joe Caithness Mastering, Joseph Lyons, Justin Perkins, Laurent Sevestre, Michael Wynne, Miro Pajic, Murray Campbell | Beatworld, Niklas Silen, Nil Hartman, Pete Grandison, Resoundsound Mastering, Rich Prewett, Richard Pentrose, Robi Bulesic, Roland Löhlbach, Ruairi O'Flaherty, Sean Diggins, Sergey Makeev, Thaddeus Moore | Liquid Mastering, Titanio Studios, Valentin Zvukofor, Vitaly Zolotarev.